7 min read
Just now
--
Background
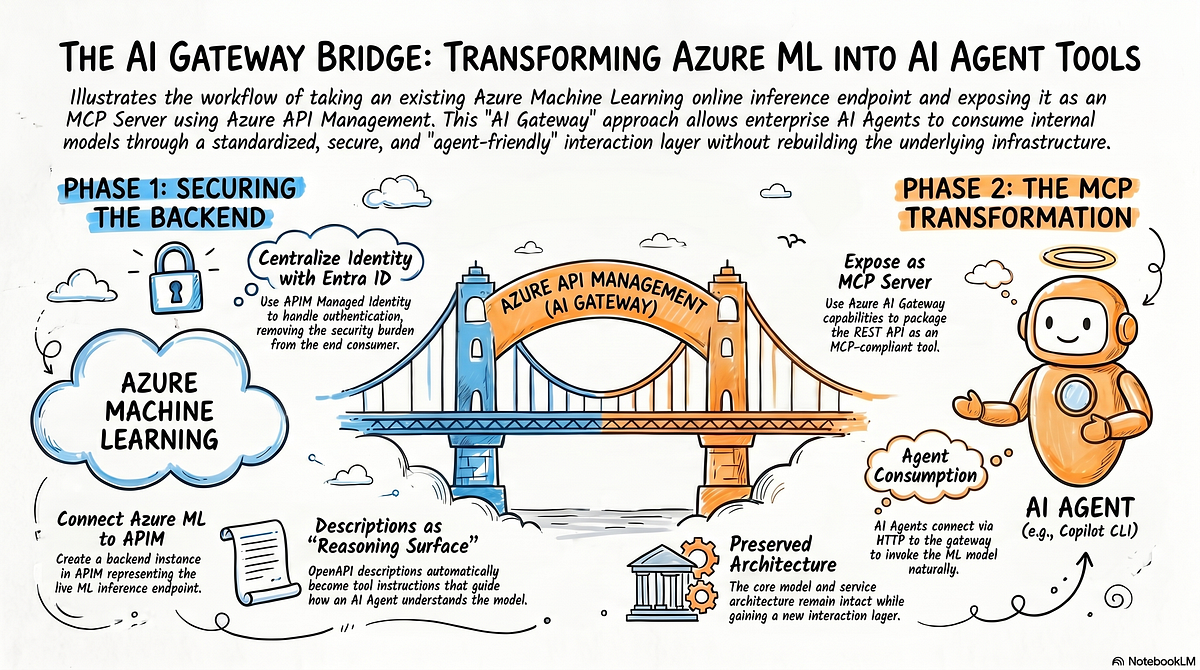
In one of my previous articles, I shared how to deploy a trained model on Azure Machine Learning and expose it as an online inference API. In this article, I want to continue along that path and share a very practical scenario: how to wrap that online inference API as an MCP service by using the Azure AI Gateway capabilities in Azure API Management (APIM), so that an AI Agent can call it in a more standardized way.
If you are exploring how to connect existing enterprise APIs with Agent systems, this is a useful pattern to understand. After reading this post, you can see how Azure ML, APIM, Azure AI Gateway, and MCP can fit together in one workflow.
Press enter or click to view image in full size
Azure AI Gateway
Many readers are already familiar with Azure API Management (APIM). In the era of AI and Agents, APIM has added a set of AI-oriented capabilities, and these capabilities are often grouped under the name Azure AI Gateway.
I will share more of those capabilities in future articles. In this post, let’s start with one of the most direct and practical scenarios: automatically exposing an existing REST API as an MCP Server.
As mentioned above, the goal here is to take an online inference API already deployed on Azure ML and further wrap it as an MCP Server.
An Azure ML Inference API Protected by Entra ID Tokens
Let’s start with an existing Azure ML online inference API. If you want to understand how this model and endpoint were developed and deployed, you can refer to my earlier article first.
I have already deployed a machine learning model on Azure ML and obtained the following online inference endpoint:
Press enter or click to view image in full size
This model can be a time-series forecasting model that predicts shipment volume based on delivery dates. The exact business context is not the focus of this article, so you can simply treat it as a black-box service. That is enough for understanding the rest of the workflow.
The inference API URL is shown below. Please keep this address in mind, because we will use it later as the backend service behind Azure AI Gateway:
https://forecast-endpointlqk2abkkuzazg.swedencentral.inference.ml.azure.com/scoreAnother important point is that this inference API uses Microsoft Entra ID access tokens for authentication. We will reuse the same authentication model later in Azure AI Gateway.
Below, I invoke the endpoint through the Azure CLI ml extension. I have already run az login in the current terminal session, so the locally cached access token is enough to satisfy the authentication requirement of this endpoint:
az ml online-endpoint invoke --name forecast-endpointlqk2abkkuzazg --request-file sample-input.json --resource-group lab-simplified-ml-models --workspace-name aml-lqk2abkkuzazgThe result looks like this, and the invocation succeeds:
Press enter or click to view image in full size
Great, right? Based on this result, let’s move on and integrate the inference API into APIM.
Integrate the Azure ML Inference API into APIM
First, create a Backend instance in APIM for the inference service. In my case, I name it ml-prediction-api-backend.
Press enter or click to view image in full size
Next, create an API instance based on the Swagger/OpenAPI document of the inference endpoint. The document itself is not unusual, but there is one detail worth paying attention to.
The description field is very important. Later, the description of the MCP tool function will be derived automatically from this field. Since MCP tool descriptions strongly influence how an Agent selects and invokes tools, it is worth taking the time to write them clearly.
{
  "openapi": "3.0.1",
  "info": {
    "title": "ML Prediction API",
    "description": "API for invoking an Azure ML online endpoint that serves a vaccine delivery forecasting model. Accepts a distributor ID and delivery date, returns a predicted value.",
    "version": "1.0.0"
  },
  "paths": {
    "/score": {
      "post": {
        "operationId": "predict-forecast",
        "summary": "Generate a forecast prediction",
        "description": "Invoke the Azure ML managed online endpoint to generate a time-series forecasting prediction for vaccine delivery based on a distributor ID and scheduled delivery date.",
        "requestBody": {
          "content": {
            "application/json": {
              "example": {
                "input_data": {
                  "index": [0],
                  "columns": [
                    "ShipToDistributorOrgRefId",
                    "ScheduledDeliveryDate"
                  ],
                  "data": [
                    [52080158.0, "2019-12-12"]
                  ]
                }
              }
            }
          }
        },
        "responses": {
          "200": {
            "description": "Successful prediction response",
            "content": {
              "application/json": {
                "example": [42.5]
              }
            }
          }
        }
      }
    }
  }
}
After that, you will get an API instance like the following one, exposing the /score inference endpoint:
Press enter or click to view image in full size
Next, we need to complete two configurations:
- Point this API to the real online inference service as its
backend. Here we use the backend instance created above. - Configure the Microsoft Entra ID access-token-based authentication required by the inference endpoint.
Both can be done through APIM policy:
<policies>
  <inbound>
    <base />
    <set-backend-service backend-id="ml-prediction-api-backend" />
    <authentication-managed-identity resource="https://ml.azure.com" output-token-variable-name="aml-access-token" ignore-error="false" />
    <set-header name="Authorization" exists-action="override">
      <value>@("Bearer " + (string)context.Variables["aml-access-token"])</value>
    </set-header>
  </inbound>
</policies>
This part is where a solid understanding of APIM starts to matter, so let’s break it down.
Get Chris Bao’s stories in your inbox
Join Medium for free to get updates from this writer.
Remember me for faster sign in
The following line binds the API to the backend service. This is the straightforward part:
<set-backend-service backend-id="ml-prediction-api-backend" />The next line tells APIM to use its own managed identity to authenticate, obtain the access token required by Azure ML, and store that token in the aml-access-token variable:
<authentication-managed-identity resource="https://ml.azure.com" output-token-variable-name="aml-access-token" ignore-error="false" />Then we write that access token into the HTTP Authorization header. That header is sent to the backend service, which is the Azure ML online inference API. This is exactly the authentication mechanism required by the backend:
<set-header name="Authorization" exists-action="override">
  <value>@("Bearer " + (string)context.Variables["aml-access-token"])</value>
</set-header>
Of course, to make this work, you also need to follow the RBAC model and grant an appropriate role to the APIM managed identity in the corresponding Azure ML workspace, for example Azure ML Data Scientist.
Press enter or click to view image in full size
APIM’s built-in Test tool makes it easy to verify that this configuration is working:
Press enter or click to view image in full size
This design brings at least two clear benefits. First, compared with an API-key-based approach, it is more secure because the access token expires. Second, it reduces the burden on downstream consumers of APIM. For example, the MCP service that we create in the next step does not need to attach extra authentication headers explicitly, because APIM already handles that work for us. Smart design, right?
Up to this point, most of the work is still about cloud application integration and architecture rather than AI itself. Next step, let’s expose this API directly as an MCP service.
Expose the Azure ML Inference API as an MCP Server
This step is actually the simplest one. In APIM, choose Expose an API as an MCP Server, then fill in a small amount of metadata. In this example, the generated MCP service is named ml-prediction-mcp.
Press enter or click to view image in full size
As mentioned above, the tool descriptions exposed by this MCP service are directly derived from the description fields in the original Swagger/OpenAPI document:
Press enter or click to view image in full size
Under the hood, the implementation is not very complicated. APIM is still calling the existing API interface, and then packaging it as an MCP Tool according to the MCP protocol. That’s an interesting point, because it means you can reuse existing REST APIs instead of rebuilding the capability from scratch.
Validate It with GitHub Copilot CLI
Now let’s connect this MCP service to GitHub Copilot CLI and see the result.
Run /mcp add to add the MCP Server. Since this is a remote service, we need to choose the HTTP protocol:
Press enter or click to view image in full size
Then let Copilot Agent invoke it once. The result is quite straightforward:
Press enter or click to view image in full size
Summary
In this example, we wrapped an Azure ML online inference API as an MCP Server through APIM and Azure AI Gateway, and we used APIM’s managed identity to handle identity delegation to the backend Azure ML service.
The value of this approach is clear: you can reuse an existing REST API while exposing it in a more Agent-friendly and standardized form. If you already have a set of protected internal enterprise APIs, this pattern is worth studying. A practical strategy is to centralize authentication and governance in APIM first, and then consider exposing those capabilities to AI Agents through MCP.
I think this is a very practical bridge between traditional cloud integration and the new Agent ecosystem. I will share more Azure AI Gateway scenarios in future articles.
I am Chris Bao, a Microsoft Certified Trainer focused on the Azure AI platform, with hands-on experience in Azure AI services and agent development.
I provide training and consulting services for both enterprises and individuals. For collaboration, please contact: baoqger@gmail.com